Modernizing Lab Setup with React
Here at MSK’s Molecular Pathology Department we go through a lot of PCR Plates. It’s the basis of almost every genetic test we run. However, like many medical lab practices, test setup could be a hassle. We shadowed our technologists through this painstaking process and decided to build a web-based solution that would cut down their prep time. A few months later we now have a React & Flux based web application that streamlines the setup of some of our most involved genetic assays.
For those that don’t know what a PCR Plate is - you’ve probably unknowingly seen one on tv or in the movies. It’s the set of small tubes the actor or actress is always pipetting liquid into in commercials for labs, universities, or even in crime dramas. It looks something like this:
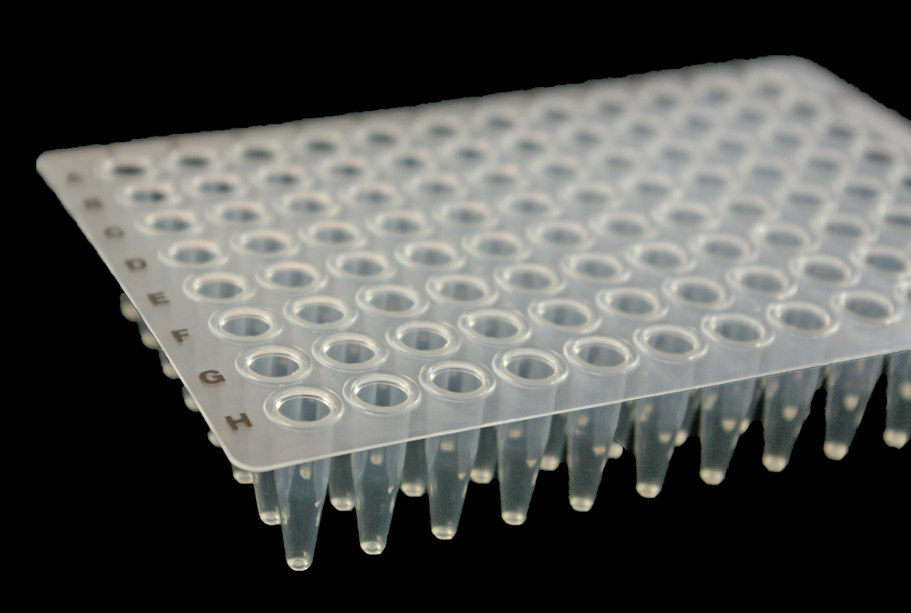
Each well in the plate gets a sample mixed with reagents, and then the plate is placed into a sequencer where the tests are run. The sequencer generally has its own software where the results are exported to one of our many other bioinformatics tools (more on those in future posts).
The Problem
For each group of samples (called a run) the lab technologists faced a workflow that looked like this:
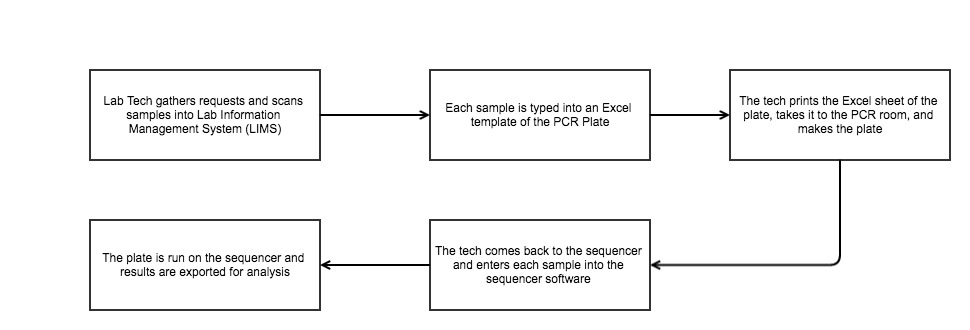
Assuming all goes well, that’s still about an hour of work per run. It gets even worse if a sample is mistyped, or a mistake is made while making the plate.
To alleviate all this repetitive typing we looked at generating an input file for the sequencer directly from LIMS (the first step in the workflow). Since the samples were scanned into LIMS, we could make them available via a set of RESTful web-services. Our new utility could query LIMS, recognize the new run, and generate an input file for the sequencer.
However, this solution took away a few key capabilites from the lab. First of all, depending on the test one sample may not match to only one well. Some tests require three or four different reagents with each sample, not including controls. Also, the logical layout of the plate differs from test to test. Things like seperation between wells, placement of controls, and technologist preference all play a factor.
Our Solution
While generating the layout programmatically was possible, we wanted to give the lab technologists the flexibility to arrange the plate however they saw fit. If the tech created the plate on the web app, we could use the layout to generate an input for the sequencer. Having the plate layout on a web application was also extremely helpful for quality control and compliance. Once we had a record of how the plate was created we could keep that in case there was contamination or issues with our final results.
Fortunatelly there were some open source libraries out there that helped make all this possible. For the overall UI design we chose React-Material-UI, mostly for the great look on both mobile and normal browsers. Since the PCR plates were made in a seperate room from the rest of the lab, we wanted something the lab techs could use in both locations. NYC is famous for its cozy (read “small”) apartments, and our lab is no different. The PCR room doesn’t have enough room for laptops or desktops, so we wanted the techs to be able to use tablets to view and make any changes to the web version of their plate.
Since we didn’t want to sacrifice flexibility for the technologists capabilities like adding, deleting, editing, and cloning samples were a must. We also needed to make the samples moveable on the plate. If the technologist wanted to seperate a set of samples from others, the webapp needed to allow that. To make that action as intuitive as possible we wanted a drag and drop wrapper around each sample. We were inspired by the work done on react drag and drop (React DnD), so we worked off of that to make the samples movable.
The End Result
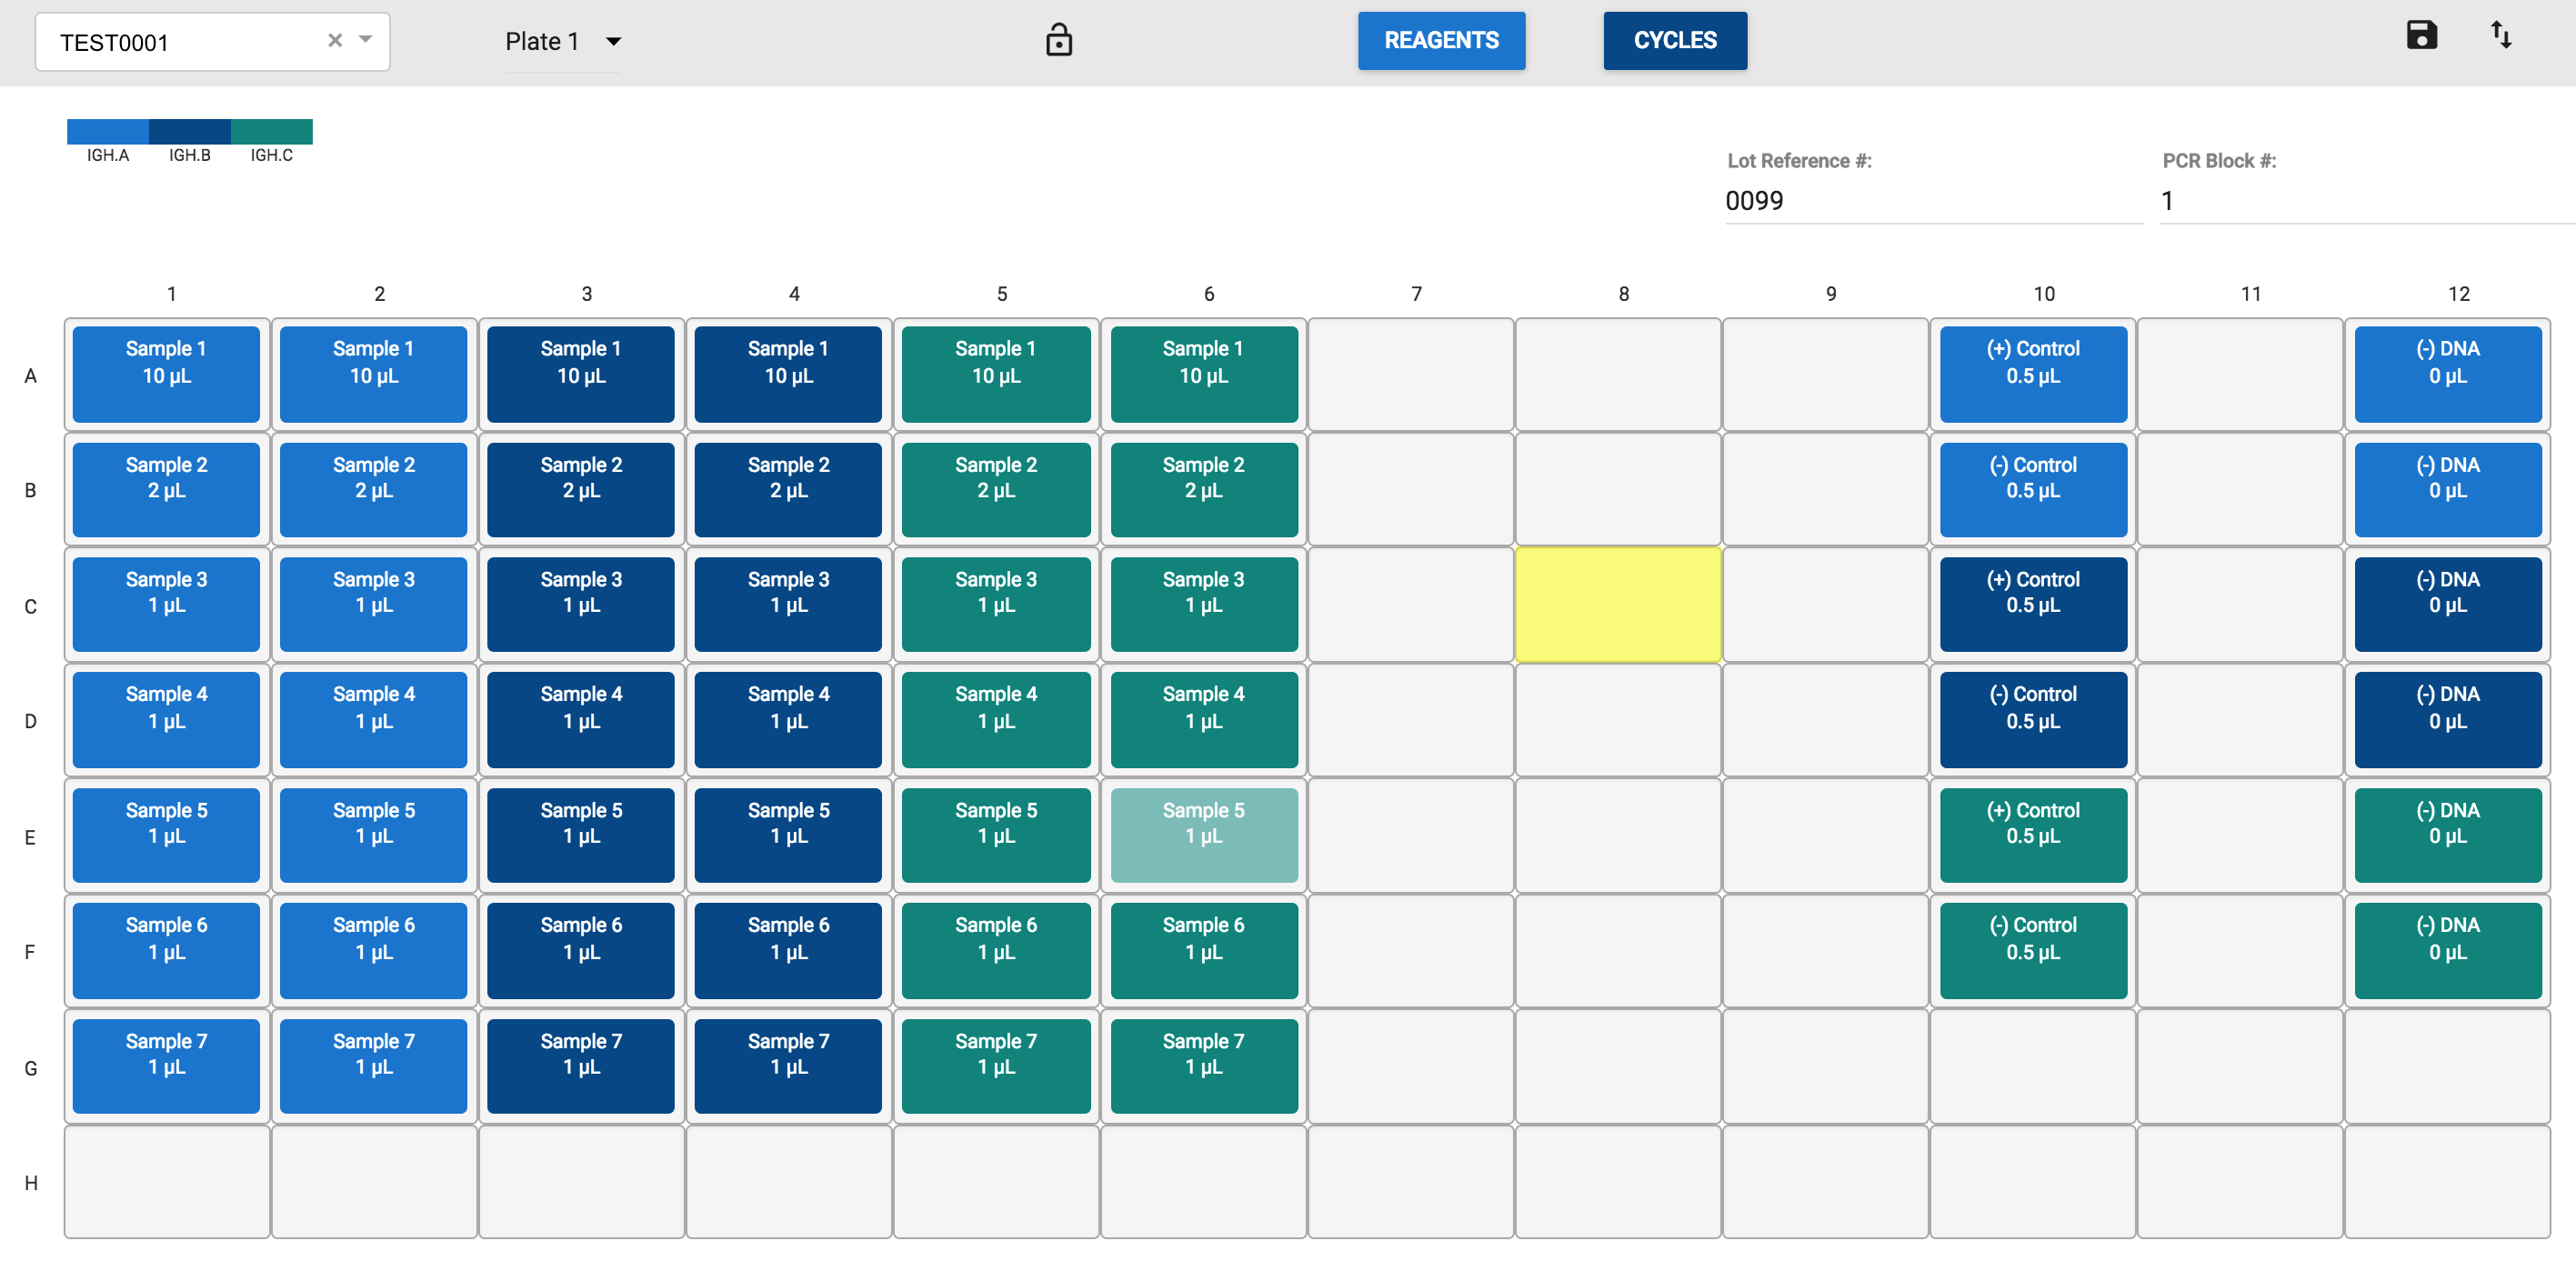
Each sample is shown with the required amount of mix, and different colors indicate different assays. Technologists can click (or tap) each sample to modify the details, clone the sample or delete it. Clicking an empty well allows users to add a new sample, and once created each sample can be dragged into position. The piece de resistance is the ability to export the run via the button in the upper right hand corner. This saves the technologists from having to type the run into the sequencer, and nets us about a half hour of time saved per run.
So far this architecture has been flexible enough to handle a variety of assay setups. It works for assays with multiple plates, extra controls and even accounts for last minute additions to the plate. The application is still in it’s infancy, but even after only a few months of use it’s saved our lab technologists over 100 man-hours of manual work and significantly cut down on errors.
Technical Details
React & Flux Architecture
We use Flux Stores to maintain the list of samples on the current plate and their locations. To make data access easier we actually store the locations and the samples in seperate stores. The SampleStore contains an Immutable Map with unique ids refering to each sample. Then, in the PlateLocationStore we map each sample id to a PlateLocation object array containing the row, column, and plate number. Adding plate number was needed to handle runs with multiple plates, which is often the case with more involved assays.
// Excerpt of PlateLocationStore

type State = Immutable.Map<string, PlateLocation>;

class PlateLocationStore extends MapStore<string, PlateLocation> {
  getInitialState(): State {
    return Immutable.Map();
  }

  reduce (state: State, action: Action): State {
    switch (action.type) {
      case 'sample/move':
        return state.setIn([action.accession_number, 'location'], action.location);
      case 'sample/create':
        return addSample(state, action.accession_number, action.location);

      // ... additional cases handled here

    }
  }

// ...

}
// Excerpt of SampleStore

type State = Immutable.OrderedMap<string, IncludedSample>;

class SampleStore extends ReduceStore<string, IncludedSample> {
  getInitialState(): State {
    return Immutable.OrderedMap();

  }

  reduce (state: State, action: Action): State {
    switch (action.type) {
      default:
        return state;
      case 'sample/create':
        return addSample(state, action.accession_number,
          action.chosen_volume, action.concentration,
          action.assay_type, action.patient_first_name,
          action.patient_last_name);

      // ... additional cases handled here

      case 'receive-plate-samples':  // api response for initial load
        return addAllSamplesFromPlate(state, action.response);
    }
  }

  // ...

}
Moving the Samples
Since we aren’t searching through nested data when modifying plate locations or sample data, rendering the changes to the plate is pretty snappy. From a coding perspecitve, it’s also pretty straightforward to implement the changes in location.
const wellTarget = {
  drop(props, monitor) {
    var item = monitor.getItem();
    dispatch({
      type: 'sample/move',
      accession_number: item.id,
      location: [props.x, props.y]
    });
  }
};

function collect(connect, monitor) {
  return {
    connectDropTarget: connect.dropTarget(),
    isOver: monitor.isOver()
  };
}

class PlateWell extends Component {
  // ... render logic for each Well
}

PlateWell.propTypes = {
  x: PropTypes.number.isRequired,
  y: PropTypes.number.isRequired,
  isOver: PropTypes.bool.isRequired,
  plate_num: PropTypes.number.isRequired,
};

export default DropTarget(ItemTypes.SAMPLE, wellTarget, collect)(PlateWell);
To acheive the drag and drop capability we need to define a DropTarget. DropTarget essentially acts as a wrapper that allows us to specify a particular component as a place we can drop our draggable component (called the DragSource). The DropTarget needs a spec to describe how it will respond to dropped objects. Here, that’s described by wellTarget. The wellTarget object contains the “drop” function that dispatches a ‘move’ action to our Stores. The PlateLocationStore will receive that dispatched action and modify the location of the sample. The collect() function is another requirement of DropTarget that specifies the props to inject into the DropTarget component. For more information on DropTarget & ReactDnd, check out the fantastic project documentation here.
Making the Samples draggable is extremely similar:
const SampleSource = {
  canDrag(props) {
    return !props.lockDrag;
  },

  beginDrag(props) {
    return {id: props.sample_num};
  }
};

function collect(connect, monitor) {
  return {
    connectDragSource: connect.dragSource(),
    isDragging: monitor.isDragging()  //lets us change the rendering style
  }
}

class Sample extends Component {
  // ... Sample rendering logic and propTypes

}

export default DragSource(ItemTypes.SAMPLE, SampleSource, collect)(Sample);
One thing that’s worth noting here is canDrag(). The canDrag() definition allows us to indicate to the DragSource wrapper whether or not the sample can be moved. This is especially helpful for building our “lock screen” feature. Once a plate is complete, we want the tech to be able to disable editing of the plate. We added a lock button to the menu bar, and pass it’s status (true/false for lockDrag) as a React prop to canDrag(). This feature is also helpful for viewing the plate on a mobile device, since touching the plate area to scroll or zooming on individual samples can inadvertantly cause other samples to move.
Editing Samples
To allow adding or editing samples we specify an onClick() function for each PlateWell.
class PlateWell extends Component {

  handleClick() {
    dispatch({
      type: 'sample/open-sample-modal',
      xLoc: this.props.x,
      yLoc: this.props.y,
      plateNum: this.props.plate_num
    });
  }

  // ... rest of PlateWell class definition
}
This onClick() function opens a dialog box where the user can edit or view all the details for the sample at the clicked location. If there isn’t a sample found at the clicked locaiton we know it’s supposed to be a new sample, and we render the empty dialog box for the user to fill in.
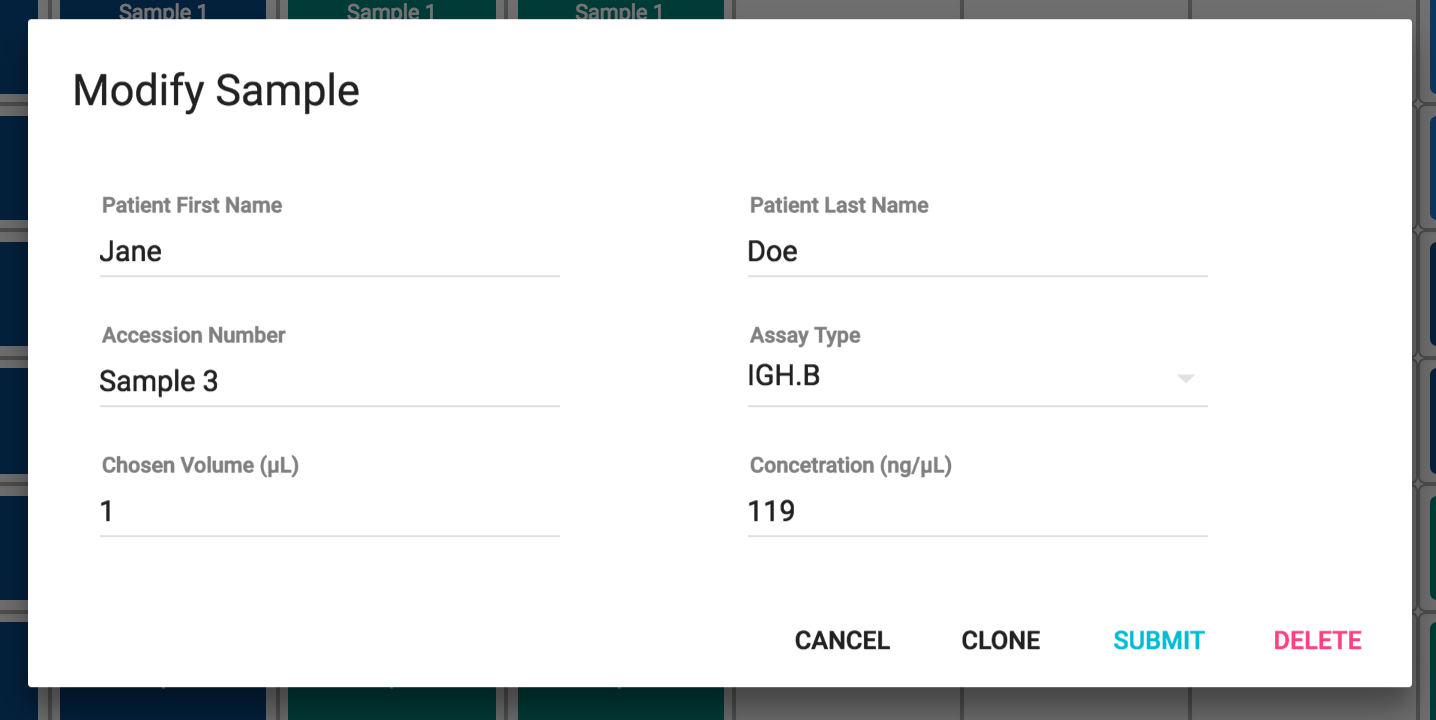
The Editing Dialog when the user clicks a Sample
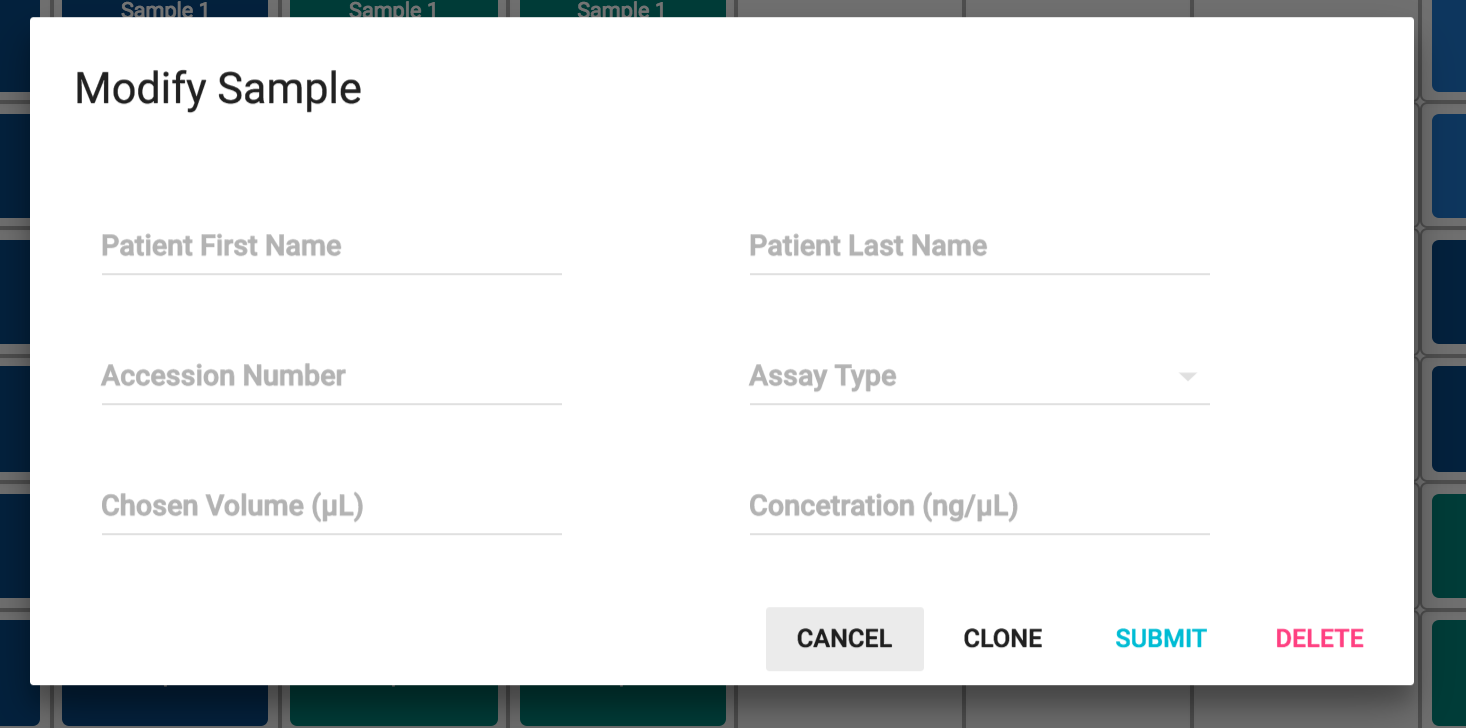
The Editing Dialog when the user clicks an Empty Well
We store all the edited information in a seperate Flux Store. Once the user clicks Submit we propogate the changes to the SampleStore.
Next Steps
Over the coming months we’re excited to extend the application to more assays and include more advanced features. One thing we are really interested in is user preferences for controls/sample placement, but we’re open to anything our technologists can think of!

Software Engineer